


How to tie a tie for school boy, girl, 10 seconds, windsor knot step by step.
Particularly if it’s your first time, tying a tie can appear to be an incredibly difficult task to complete. However, it is a skill that can be mastered by anyone who puts in a little bit of effort and has some patience. The following is a detailed instruction on how to properly tie a tie:
Here are step-by-step instructions on how to tie a tie:
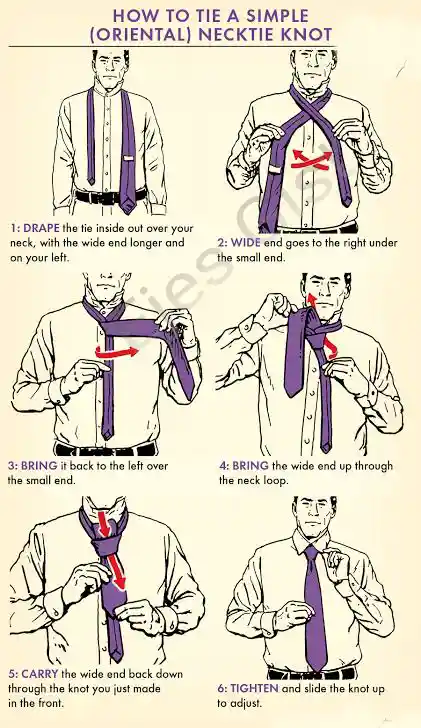
- You should start by draping it around your neck with the wide end on your right side. the narrow end on your left side. The wide end should be longer than the narrow end.
- At this stage, you should cross the wide end over the narrow end near your neck.
- So, bring the wide end up and over the loop around your neck.
- Bring the wide end down and behind the knot.
- Bring the wide end up and over the knot from the front.
- Bring the wide end down through the loop that you created in step 3.
- Tighten the knot by pulling on the narrow end while holding the knot with your other hand.
- Adjust the knot and the length of the tie as needed.
- Finally, tuck the narrow end of the tie behind the wide end and adjust your collar.
Watch Video Here
How to tie a tie in 10 seconds.
Tying a tie in 10 seconds may not be possible, as it takes a bit of time and practice to get it right. However, you can try the following quick method, which may take around 20-30 seconds:
- To begin, drape the it around your neck so that the wide end is on the right side and the narrow end is on the left side. It is important that the wide end be longer than the short end.
- To secure it around your neck, cross the wide end over the narrow end.
- Raise the narrow end so that it goes over the loop that is around your neck.
- Bring the wide end down to where the knot is and behind it.
- Bring the narrow end to the front and cross it over the knot.
- Bring the narrow end up through the loop that you created in step 3, and then bring it down.
- Pulling on the narrow end while holding the knot in place with your other hand will allow you to make the knot tighter.
- As necessary, adjust both the size of the knot and the length of the tie.
- Put the thinner end of the tie behind the wider end as quickly as you can.
- Adjust your collar and you’re done!
Also see How to lose weight naturally without exercise and dieting
Remember, this method may take a little practice to get the timing right, but it can be a great option if you’re short on time
How to tie a tie windsor knot step by step.
A traditional knot known as the Windsor Knot is one that is only marginally more difficult than some of the more straightforward knots. The following is an in-depth guide that will teach you how to tie a Windsor Knot:
- Start with the wide end of the tie on your right side, extending about a foot below the narrow end on your left.
- Cross the wide end over the narrow end, wrapping it behind the narrow end and bringing it up and over the loop around your neck.
- Take the wide end down and bring it up, crossing it in front of the narrow end again.
- Bring the wide end up and over the loop around your neck, then bring it down and through the loop that you created in step 3.
- Take the wide end and bring it over to your left side.
- Bring the wide end up, passing it over the knot from the back.
- Bring the wide end down through the loop that you created in step 5.
- Finally, adjust the knot and the length of the tie as needed.
Although there are a variety of different knots that can be tied, the fundamental steps remain the same. The Windsor knot is frequently seen at formal events, whereas the Four-in-Hand knot is a straightforward and adaptable knot that can be worn to both formal and informal events.
It is important to keep in mind that practise makes perfect; therefore, you should not become disheartened if it takes you a few tries to get it right. If you’re having trouble, you can also try watching some tutorial videos or asking someone else for assistance. You will be capable of tying a tie with ease and self-assurance with just a little bit of practise.
Congratulations! You have successfully completed a Windsor Knot. You might need a little bit of practise before you can get it right, but if you have some patience, you’ll be able to tie a perfect knot in no time at all.
Types
You can wear a variety of ties, and the type of tie you wear will depend on the occasion, your personal style, and the outfit you are wearing. Here are some examples of common types of ties:
Necktie – the most common type of ties for formal occasions, job interviews, and business settings. Neckties are typically worn with a dress shirt and suit and come in a variety of colors, patterns, and fabrics.
Bowties are typically worn for more formal occasions such as weddings, black-tie events, or proms. Bow ties are available in a variety of colors, patterns, and materials and can be pre-tied or self-tied.
Skinny ties are narrower than traditional neckties and are frequently associated with more modern and fashion-forward looks. Skinny ties go well with a wide range of outfits, including casual and business attire.
Knittie – This type of ties is made of knitted fabric, which gives it a distinct texture and appearance. Knit ties are less formal than traditional neckties and are frequently worn with sport coats or cardigans.
Bolo ties are typically associated with Western wear and have a distinctive braided cord or leather strap with an ornamental clasp or slide.
Cravat – A cravat is a decorative neck scarf tied in a knot and worn with a dress shirt. Cravats were popular in the 18th and 19th centuries and are now primarily worn for formal occasions such as weddings.
